I have been away from my blogging for a few years and just
happened to check back and see that links no longer work for
downloading.
I will plan on updating lots of stuff here in the near future.
Have a blessed day. Kat
Welcome

Wednesday, June 19, 2019
Sunday, March 8, 2015
Freebie Snowman
Can't seem to get away from cold weather things this week. I love snowmen...so here's another one. Just right click and save...

Saturday, March 7, 2015

Saturday, February 28, 2015
Sheena
This little angel was made in special honor for a young lady named Sheena. She was the daughter of someone I am so glad to call my friend.
Hello everyone, my name is Sheena. I live in Heaven now, but my light still burns brightly here on earth. I live on in the memories of those I loved and who loved me.
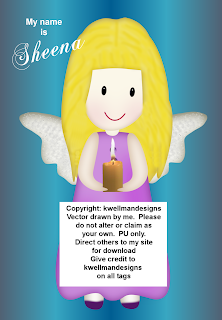
Click preview to download
Been playing around with Sheena and named her twin Shawna.

Monday, February 23, 2015
Lisa
I have been trying a few new ways of drawing. I think "Lisa" turned out pretty. Not perfect, but if anyone likes her, she is a "FREEBIE" for your personal use only. Please see my terms of use and abide by them. For your convenience I have posted her here in png format. Just right click and save.

Friday, February 20, 2015
Janie and Jennie
This is Janie. She is FREE for your personal use only. Uploaded here as PNG for your convenience. Just right click and save to your computer.

And this is Jennie. Just a little different version.


Janie and Jennie are copyrighted to kwellmandesigns. They were drawn by me and all credit belongs to kwellmandesigns. Please do not alter or claim as your own. If used, please give credit to kwellmandesigns on your tags or projects.
Feel free to share your work with me, mschowwv@yahoo.com
Tuesday, February 17, 2015
Sally
Good morning everybody. We have been enjoying a Winter storm here in Southern West Virginia so I took some down time to play around in psp. I ended up with a sweet little girl that I named "Sally". She is FREE for your personal use only. Just right click and save!

Sally is copyrighted to kwellmandesigns. She was drawn by me and all credit belongs to kwellman designs. Please do not alter or claim as your own. If used, please give credit to kwellmandesigns on your tags or projects.
Feel free to share your work with me, mschowwv@yahoo.com
Subscribe to:
Posts (Atom)
